Pages

Thursday

One-Size-Fits-All USB Multi-boot NTFS Flash Drive

How to make multi-boot NTFS USB flash drive One-Size-Fits-All.

Introduction.

One day I’ve desired to have in my pocket one-size-fits-all USB flash drive with multi-boot different operating systems and NTFS file system.
ClickZoom-in buttonorZoom-out buttonto increase/decrease image size...
One-Size-Fits-All USB Multi-boot Flash Drive

What for? For system repair. And just as heaps of space for different kind of data at the same time.
For example Windows 7/XP, DOS(Yes!), some Linux Live-CD systems.

Having so strong desire I couldn’t think about nothing except how to satisfy it.
Unsatisfied desire cause some problems… Sometimes… Thought this is another subject.

I’ve found a lot of links for creating bootable flash drives that seemed to me not very useful.
In spite of detailed descriptions and rank of writers.

But “There Is More Than One Way To Do It”.

I tried to experiment with separate partitions of USB flash drive. For Linux-like system there are no problems.
But Windows give access only for the first partition. While command compmgmt.msc shows all partitions.

I’ve selected the only one NTFS partition for full flash drive.
All live operating systems are installed just to simple folders.

Few kind of live systems are enough for me:
Detailed proven procedure.

1. Format flash USB drive as NTFS with usb_format . This is the best choice among different format utilities. And really format USB flash as NTFS!

2. Setup GRUB for DOS package by grubinst_gui.
In the small window choose “disk” and click “refresh” and “MBA”.

3. Copy file grldr from GRUB for DOS to the root of flash drive.
Here we are! Our USB flash drive is now BOOTABLE!

4. Knoppix 6.7. Just copy files from /boot/syslinux and /knoppix from ISO-image to USB /knoppix (using for example UltraISO programm).

5. Copy HBCD folder from Hiren’s Boot CD.
Now we have Mini-XP set! Easy!

6. It is very easy to install DOS – just copy files io.sys, msdos.sys,command.com
to the root of USB flash drive.
This is DOS minimum. Make also \DOS folder and put some utilities you need there.

7. And lovely Puppy Linux!
Make \Puppy folder and put there files initrd.gz, pup_420.sfs, vmlinuz.

8. At last (or by the way…) we create menu.lst file in the root of Flash drive.

The final content of menu.lst:

color white/black yellow/red green/black green/black
timeout 30
default /default

title KNOPPIX 6.7 Graphics mode (run-level 5)
find --set-root /KNOPPIX/linux
kernel /KNOPPIX/linux lang=en ramdisk_size=100000 vt.default_utf8=0 apm=power-off nomce libata.force=noncq hpsa.hpsa_allow_any=1 loglevel=1 tz=localtime
initrd /KNOPPIX/minirt.gz

title KNOPPIX 6.7 Text mode (run-level 3)
find --set-root /KNOPPIX/linux
kernel /KNOPPIX/linux lang=en ramdisk_size=100000 nomce quiet libata.force=noncq hpsa.hpsa_allow_any=1 loglevel=1 nolapic_timer 3
initrd /KNOPPIX/minirt.gz

title KNOPPIX VGA normal
find --set-root /KNOPPIX/linux
kernel /knoppix/linux ramdisk_size=100000 vga=normal nosound nolapic_timer nomce xmodule=vesa
initrd /knoppix/minirt.gz

title Adriane
find --set-root /KNOPPIX/linux
kernel /knoppix/linux ramdisk_size=100000 vga=0x311  nomce quiet loglevel=0 nolapic_timer adriane
initrd /knoppix/minirt.gz

title Mini Windows Xp from Hiren's CD
find --set-root /HBCD/XPLOADER.BIN
chainloader /HBCD/XPLOADER.BIN

title DOS
chainloader (hd0,0)/io.sys
rootnoverify (hd0)

title Puppy
find –set-root /Puppy/vmlinuz
kernel /Puppy/vmlinuz psubdir=Puppy
initrd /Puppy/initrd.gz


That’s’ ALL! Free of charge! No payment at all!

Threw out all you don’t need from menu.lst or add some useful there. It’s all up to You!

Man Should Have a Choice. Always.

Seems my post is too long… 'Nough said. If you feel like it you're the doctor. And someone read when he want.
Freedom of choice again!
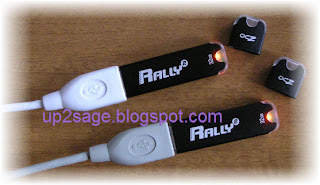
Bunch of One-Size-Fits-All USB Multi-boot Flash Drives

This is why I love internet!

Friday

Double Subtitles At The Same Time or The Easy Way to Improve Your English

Some people are using subtitles for learning a foreign languages.

Obvious advantages of this method is that you learn a real spoken language, remembering a lot of useful phrases and figures of speech.
And you quickly start to understand the speech of native speakers.
And you choose the study materials yourself.

While using subtitles you often face a problem. When you hear an unknown word, you have to stop the film and look it up in the dictionary.
It takes a lot of time. And your desire may be disappeared.

But the solution is simple!

Just copy and paste the content of first subtitles file to the second. Or vise versa. Doesn't matter! Use any editor (like Notepad).

As a result you get both languages subtitles in one file.
And both languages subtitles at the bottom of the screen like this (Spanish + English):

Double subtitles

Now you won't be distracted from a good film to refer to the dictionary.
Your native language and the translation are at the same time in one place!

No plugins, no extra software.
Just save your money!

Wednesday

Knoppix 6.5 remastering

Some time ago Klaus Knopper http://www.knoppix.org has introduced Knoppix 6.5 at CeBIT in Hanover on March 1st with exlusive DVD issue. Knoppix is the world's greatest Live distro and one of the oldest and most widely-recognized Linux operating systems.

The new Knoppix 6.5 is Live DVD system and may be installed on a USB stick or hard drive.

Knoppix 6.5 includes flash-knoppix for bootable USB sticks and improved support foe NVidia cards.
CeBIT DVD release includes ~9GB software - more than 3000 packages!


Knoppix 6.5 comes with a 64bit kernel in addition to the 32bit.
If you like to try the new kernel you must enter knoppix64 instead of knoppix at the boot: prompt.

For NVIDIA graphics adapter Knoppix 6.5 will use the proprietary driver automatically.
But the cheatcodes xmodule=nouveau and xmodule=vesa are still available for unsupported graphics adapters.

Adobe's Flash plugin support Flash content on web pages.

The HD install procedure requires about 15 GB free disk space and a 1 GB swap partition.
The installation on USB stick using the flash-knoppix also requires at least 200 MB free disk space if you like to use a persistent image.

There are new cheatcodes: nodmr and nofb.


Here we are!
ClickZoom-in button or Zoom-out button to increase/decrease image...

28 Simple Steps for KNOPPIX 6.5 DVD remasternig.

1. Burn and boot DVD iso-image. For example  Download KNOPPIX 6.5 DVD RU

2. Make source and master folders for future new system:

mkdir /mnt/hda1/knx
mkdir /mnt/hda1/knx/source
mkdir /mnt/hda1/knx/source/KNOPPIX

mkdir /mnt/hda1/knx
mkdir /mnt/hda1/knx/master
mkdir /mnt/hda1/knx/master/KNOPPIX

3. Copy root folder /KNOPPIX :
cp /KNOPPIX /mnt/sda1/knx/source/KNOPPIX

4. Also copy :
cp -ar /mnt-system/boot /mnt/hda1/knx/master/boot
cp /mnt-system/index.html /mnt/hda1/knx/master/
cp /mnt-system/KNOPPIX/modules /mnt/hda1/knx/master/KNOPPIX ( the same for background.jpg knoppix-logo-medium.png …)

5. Setup chroot environment :
mount --bind /dev /mnt/hda1/knx/source/KNOPPIX/dev
mount --bind /proc /mnt/hda1/knx/source/KNOPPIX/proc
mount --bind /sys /mnt/hda1/knx/source/KNOPPIX/sys
and GO:
chroot /mnt/hda1/knx/source/KNOPPIX

6. Activate network:
ifconfig eth0 192.168.20.7 (your IP address)
route add default gw 192.168.20.1 (your default gateway IP address)
Edit resolv.conf :
search mydomain.com
nameserver 192.168.20.10 (your domain server IP)
Check : ping google.com

7. Get current updates list:
apt-get update
dpkg-query –l > packages.txt - list of packages

8. Delete unnecessary packages:

apt-get remove --purge name-of-package-to-remove

9. Add necessary packages:
apt-get install

10. Edit /etc/console-tools/config:
SCREEN_FONT=
SCREEN_FONT_MAP=.sfm

11. X11 keyboard switch:  /etc/default/console-setup:
XKBMODEL="pc105"
XKBLAYOUT="us,ru"
XKBVARIANT="nodeadkeys"
XKBOPTIONS="grp:ctrl_shift_toggle,grp_led:scroll"

12. Edit /etc/default/console-setup:
CHARMAP=”UTF-8”
CODESET=”Uni1”
XKBMODEL=”pc105”
XKBLAYOUT=”us,ru”
XKBVARIANT=”nodeadkeys”
XKBOPTIONS=”grp:ctrl_shift_toggle,grp_led:scroll”
KEYTABLE=”ru”

13. Edit /etc/default/keyboard:
KEYTABLE=”ru”
XKBMODEL=”pc105”
XKBLAYOUT=”us,ru”
XKBVARIANT=”nodeadkeys”
XKBOPTIONS=”grp:ctrl_shift_toggle,grp_led:scroll”

14. Edit /etc/environment:
LANG=”ru_RU.UTF-8”
LANGUAGE=”ru_RU.UTF-8”
LC_MESSAGES=”ru_RU.UTF-8”
LC_ALL=”ru_RU.UTF-8”

15. Edit /etc/locale.alias :
russian ru_RU.UTF-8 

16. Edit /etc/locale.gen - (remove comment for proper locale name) and run:
locale-gen

17. Edit autostart in /etc/rc.local :
SERVICES="console-setup "

18.Edit /etc/profile:

export LANG = ru_RU.UTF-8
export LANGUAGE = ru_RU.UTF-8
export LC_MESSAGES = ru_RU.UTF-8

19. Copy:
cp /home/knippix /etc/skel
cp /home/knoppix /root

20. SUPER!!!! X Window Keyboard switch:
Edit file /usr/share/X11/xorg.conf.d/10-evdev.conf. Add:
Option “XkbRules” ”xorg”
Option “XkbModel” ”pc105”
Option “XkbLayout” ”us,ru”
Option “XkbOptions” ”grp:ctrl_shift_toggle, grp_led:scroll”

21. Edit /etc/init.d/knoppix-autoconfig:
   ru) # Russian version
  COUNTRY="ru"; LANG="ru_RU"; LANGUAGE="ru_RU.UTF-8"; KEYTABLE="ru"; XKEYBOARD="us,ru"; KDEKEYBOARD="us,ru"; CHARSET="UTF-8"; CONSOLEFONT="UniCyr_8x16"; KDEKEYBOARDS="us,ru"; TZ="Europe/Moscow" ;;
....
  *) # Russian version
   COUNTRY="ru"; LANG="ru_RU"; LANGUAGE="ru_RU.UTF-8"; KEYTABLE="ru"; XKEYBOARD="us,ru"; KDEKEYBOARD="us,ru"; CHARSET="UTF-8"; CONSOLEFONT="UniCyr_8x16"; KDEKEYBOARDS="us,ru"; TZ="Europe/Moscow" ;;

22. Clear IP address, cache, resolv.conf, hostname, eth0, your home history

23. For mounting USB sticks and iso in UTF8:
Edit /usr/sbin/rebuildfstab -  add iocharset=utf8

24. Clean:
COLUMNS=200 dpkg -l |grep ^rc |awk '{print $2} ' | xargs dpkg –P
apt-get clean

25. Leave the chroot (just type exit twise) and unmount

umount  /mnt/hda1/knx/source/KNOPPIX/dev
umount  /mnt/hda1/knx/source/KNOPPIX/proc
umount  /mnt/hda1/knx/source/KNOPPIX/sys


26. Create Knoppix compressed image:

mkisofs -R -U -V "KNOPPIX 6.5 xxx" -log-file /mnt/hda1/knx/iso.log -publisher "www.knoppix.net" -hide-rr-moved -cache-inodes -pad /mnt/hda1/knx/source/KNOPPIX | nice -n 5 /usr/bin/create_compressed_fs  -B 65536 -f /mnt/sda1/isotemp - /mnt/hda1/knx/master/KNOPPIX/KNOPPIX

27. Update the file hashes:
cd /mnt/hda1/knx/master
find -type f -not -name sha1sums -not -name boot.cat -not -name isolinux.bin -exec sha1sum '{}' \; > KNOPPIX/sha1sums

28. CreateLive DVD ISO:
mkisofs -pad -l -r -J -v -V "KNOPPIX" -no-emul-boot -boot-load-size 4 \
-boot-info-table -b boot/isolinux/isolinux.bin -c boot/isolinux/boot.cat \
-hide-rr-moved -o /mnt/hda1/knx/knoppix.iso /mnt/hda1/knx/master

Thats ALL!
Seems too long, but not so complicate...

Monday

BackTrack in USB multiboot list

BackTrack is very useful Linux distro.
Of course I added it to my 32G USB multiboot flash drive.
There were some tricks in BackTrack 4 beta installation on usb flash an extra ext2 patition.


But now with BackTrack 4 final release there is no problem!

Just place folders /boot and /casper from the bt4-final.ISO to the root of usb flash.

I put folder /boot to /BackTrack. But /casper should be only /casper!

My menu.lst entry:

title BackTrack live
root (hd0,0)
find --set-root /BackTrack/vmlinuz
kernel /BackTrack/vmlinuz boot=casper persistent rw
initrd /BackTrack/initrd.gz

and this is my boot snapshot for 32g USB flash drive:
ClickZoom-in buttonorZoom-out buttonto increase/decrease image size...
USB multiboot flash menu

Freedom of choice!

Thursday

Learning English by Simple Notes as Real Windfall

Why windfall?  I don't know.
I just want to improve my English.
So it seems to me that simple posts on different themes are not bad training for language practice.
I'm just studying. Not from zero but beet more.
ClickZoom-in buttonorZoom-out buttonto increase/decrease image size...
Real life Diamond
Oh, of course, windfall - as some valuable life snapshots from anywhere.
From my life and practice and other people. Some kind of life diamonds...

Sorry in advance to Everybody for my English.

Wednesday

How to Download Video from YouTube Easy or Video in Your Cache

How to download video from YouTube easy? Sorry, how to get video from YouTube?
No How. You already have it!

Where? In your cache. Indeed in your browser cache. Just rename temporary file in cache directory.

How it happens? For example, looking crazy cats video


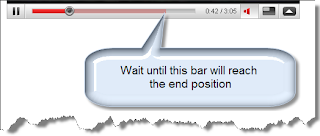
when you see YouTube player slider at the end of video clip position - it is already downloaded to your computer!

Indeed not the slider end position but thin red bar end position.

Like this:

Video in your cache or how to download Youtube video easy

I use Mozilla Firefox. Cache files are located here:

ClickZoom-in buttonorZoom-out buttonto increase/decrease image size...
Video in your cache or how to download Youtube video easy

Full path in this example:
C:\Documents and Settings\USER\Local Settings\Application Data\Mozilla\Firefox\Profiles\slwepdcu.default\Cache\

Just rename proper file to something like my_movie.avi, click it and test the result in your movie player. If it's all you expected - save and enjoy!

P.S.
Of course, file names in cache directory will be different from the example above.

Usually I mark time value starting looking YouTube video and then check it while finding file in cache directory.

Just try to rename to avi (or swf) some files with time creation stamp close to your mark.

Everybody can get any video from YouTube without extra efforts and extra software!

Check your cache sometime. May be there are more something useful...
Save Your money instead of paying for extra software in World crisis conditions!